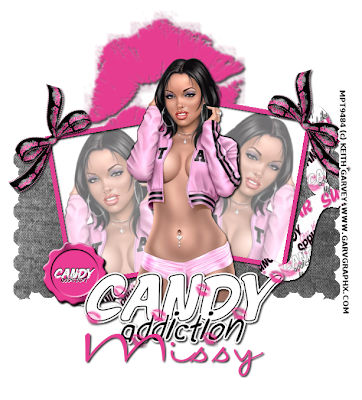
Candy Addiction
This tutorial was written by me on June 30,2009
Supplies Used:
I used the Artwork of Keith Garvey you can purchase his work HERE.
Scrapkit used is Lips Like Sugar by myself and you can buy it HERE.
I used a template 175 by Missy of Divine Intentionz Here.
Font used for my name is International Palms
Ok lets begin!
Open your template in psp
Duplicate the template, and remove the credit and background layers.
Using the magic wand click on one of the brackets
(should have marching ants around it now)
Open a paper of choice from the scrap kit
Flood fill tool: go to color pallet and click on patterns find your
Paper of choice you opened here, click on it, scale 80%
Fill your bracket with it now, selections-select none, repeat for the other bracket.
Add drop shadow of choice.
Click on Frame Layer
Using magic wand, click on the frame, hold shift down and click on the other half of the frame,
(should be marching ants around both frames)
Using your flood fill tool
Fill with color or pattern of choice, I filled with black.
Selections- select none
Add drop shadow of choice.
Click on Shape Layer
Using your magic wand, click inside the shape
(should see marching ants around the shape now)
Using your flood tool again, fill shape with a color or a paper,
I used paper 14
Click on Layer Background Frame
Using the magic wand, click inside the background
(marching ants)
Hold shift key down and click inside both backgrounds
Now using your flood fill tool.. Fill the background with a color
I chose white.
Selections- select none.
Paste tube of choice on your template now.
Making it the top layer
Add drop shadow of choice
Now from the original tube, copy and paste as new image.
Crop a head shot for the picture frames.
You might have to do this over to get the right size you want.
Now that you have a head shot, click on the frame background layer,
Paste the head shot as a new layer, position as desired.
Now duplicate that layer of the head shot, click image,
Mirror, position as desired for the 2nd frame.
Lower the opacity on both layers for the head shots,
I lowered mine to 60.
Open word art of choice.
I used Word Art 3 from the kit.
Resized mine by 50% , paste as new layer,
Make this the top layer, add drop shadow of choice.
Choose a bow to place on the corners of the frames.
Then click on the frames layer
Resize bow to your desire, then paste as new layer,
Duplicate layer, image, mirror.
Add drop shadow of choice.
Open one of the lips from the kit.
Paste as new layer, move down so it is the last layer,
Behind everything, resize as needed, add drop shadow.
Open a button or wax seal from the kit to place on the left
Side corner of the frame. Move layer under word art layer.
Add drop shadow of choice.
Add all your copyright information to your tag.
Now you can add your name!
Crop, and resize if needed.
That's it!
Would love to see your creations, feel free to email
Them to me!
Missy@ScrapsWithAttitude.com


0 comments:
Post a Comment